Media and New Technology Customized Search

Monday, May 12

layouts features

How can I use the Blogger Layouts features?


1- Go to the dashboard, and click on the template button.


If this link says Layout instead, then it's already upgraded and you can skip the rest of these steps.


2- On the Template page, search for the navigation link in the tab that says customize your design and click on it.


3- Then you will get a message explaining that Blogger will make a backing of your recent template and change it to an upgraded one. Click on the Upgrade Your Template button.


4-select your default template designs. Click Save Template when you've made your choice.


You'll end up on the new Page Elements tab, where you can start arranging things however you like.

You can easily edit and customize the colors, fonts, header and sidebar of your blog with Blogger's Layout feature. To customize your blog's layout, go to the Layout Page Elements tab in blogger.


How to arrange elements in your template?

Arrange the elements in your template as you want. You just have to click on the element that you like to move and "drag and drop" it where you want it to be. You can move your page elements to the bottom of the page, anywhere in your sidebar, or below or above your blog posts. (Note: you can move all elements except your navbar, blog posts and header in some templates.)


Editing elements in your template

Navbar: choose the color you want for your navbar.

Header: add your blog header that includes the title and description of your blog.

Blog posts: you have two options; you can choose either the number of days with posts to display or the total number of posts on the main page. You also have the choice to show email post links that let your visitors easily email posts from your blog to their friends.

Profile: add the title of your profile, 'About Me' description, and location.

Blog archive: Edit/add your blog archive title, choose your display style, choose to display post titles, display oldest posts first, choose your archive frequency (monthly, weekly or daily) and date format.

How to add a page element?

You can add several page elements to your blog page or sidebar by clicking Add a Page Element.
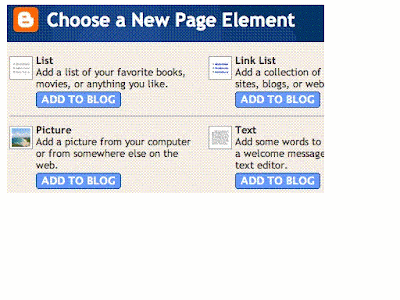
List: Add a list with the ability to add a title, select the number of items to display, sort your list alphabetically and add links to your list elements.

Link List: Add a link list to your blog with the ability to add a link list title, select the number of items to display and sort your link list alphabetically.

Labels: Add a list of all the labels you've used on your posts. Click each link to see a page showing all the posts with that label. You can change the title of the list, and sort it alphabetically or by frequency of use.

Picture: Add a picture from your computer or the web. You can also add a title and caption to your picture and shrink the picture to fit into your blog perfectly.

Text: Add text to your blog (such as a welcome message or footnote) with our rich text editor.

HTML/JavaScript: Add third-party functionality or other HTML/JavaScript code to your blog.

Feed: Add content from a site feed. Enter the feed URL, then click Continue. You'll then be able to add a title, select the number of items to show (up to five) and display the item dates and/or authors by selecting the appropriate check boxes.

Logo: Add one of our stylish Blogger logos to your blog.

Sunday, May 11

Online Storing


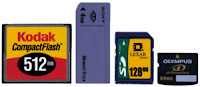
There are many ways to store files. There are the most familiar and used ways to us, which are by simply storing our files on our computer's or external hard-disk -- optical disk (CD, DVD, BD, etc...) -- flash disks (USB, Card disks) -- there was by using also floppy-disks, but thats gone now. Video and music tapes are also ways to store media files.


Life is evolving, technology is developing, new and improved ways of everything are coming to notice. The most advanced and efficient way of storing today is by storing data online.


Benifits of storing online:-


Storing online could be very useful. You could:-
  1. Store normally your files like what i do on http://www.mediafire.com/.
  2. Use this new technology to your benifit by backing-up your current files from your pc.
  3. Sharing files online.

To know more about sites that provide internet storage space, click here.
To watch a YouTube video explaining online storage, click here.
To know more about types of flash disks, click here.

Posted by: Mayez Kabbara


Friday, May 9

Make money using your Blog: AdSense

If your blog is famous and well-known; the usual way that bloggers use to make incomes is to advertise ad space on their own. But if yours is NOT known, free services such as Google's AdSense, enables bloggers to establish ad programs. AdSense allows you to go for several ads that are connected with the specific theme of your blog. You earn money in proportion to how many times the readers click on your ads for additional knowledge. The things that make blogging such an essential opportunity for groups who want to get incomes from AdSense, is that Google supports blogs because most of them focus on a particular issue. In addition companies encourage this because they like the fact that pages modify regularly, And of course because a good blog gets fans and visitors. All of that means excellent search engine rankings, well contextualized ads and plenty of good revenue.


How to subscribe to AdSense?

First step is to open the Layout in your Settings. Then add a Page Element, select the AdSense element from the new opened window. Then select the colors and look of the Ad. An email will then be sent to you explaining the next steps.


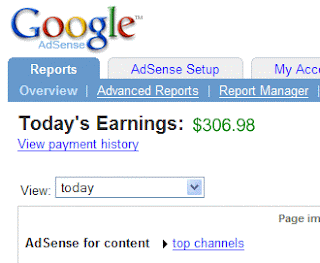
Then after ending all the procedures. You will end up with extra cash in your bank account. Just like the guy bellow.


Posted by: Ghyna Kurdy

Thursday, May 8

Cookies!

What are Web Cookies?!


Sometimes refered to as tracking cookies. It is just texts that are sent from any web site you visit to your PC. Its a link between ones server and web client. The word cookie is derived from the word "Magic Cookie" which is a well known concept of UNIX which inspired also the name of HTTP Cookies.


Cookies have been concern of internet privacy. Some feer it could allow unwanted actions, such as recieving viruses and such.

Cookies purpose is to maintain data related to the user while navigating through the web. Its almost like a automatic Tivo program.

Posted by: Mayez Kabbara

Editing your Posts

Hello new blog users :)

This post will hopefully help in making you organize your post easier and faster.

To most of you, you might have probably know by now how to create posts and editing them. But Blogger.com carries you much more options that could help you with your work and projects:


  1. Save your posts as draft: You can simply save your posts as draft by clicking the "SAVE NOW" in blue right next to the orange "PUBLISH POST" button.
    This will come in handy in case you didn't have time to finish writing your post and you wish to continue it later without putting the post on your blog.


  2. Schedule your posts to get published in a selected date: A recent feature by blogger. If you ever wrote a post that you don't wish to get published yet, and you know that you might have a difficulty to publish it on the day you wish to (because you cant have Internet access on that date or for whatever other reason). You could now schedule your posts in prior to appear on your post later.
    All you have to do is to click on the "Post Option" on the down-left side of your post-editor page. Then change the "Post date and time" on the right hand-side to a future date that you wish it to get published.

  3. To see and organize your drafts and scheduled posts. Go to "Edit Posts" in the "Posting" section of your "Settings". Then on the right-upper side, you can either click on


  • All: Which allows you to see ALL your posts (Published, drafts, and scheduled).
  • Drafts: To view and edit your drafts posts.
  • Scheduled: To view and edit your scheduled posts.
  • Published: To view and edit all your published posts.

Posted by: Ghyna Kurdy

Monday, May 5

Restore your deleted files!

Did you know that you can restore a deleted file?! I dont mean restore from the recycle bin, but i mean files that you thought have been permanantly deleted. Many might know that, but to those that dont, let me explain again. If you deleted a file by mistake, or deleted a file that you thought wasn't important but turned out that you need to use it again, then you can restore, or get that file again even after it has been deleted. How? There are many softwares that you could use -- Here is a list some of the most famous softwares or programs that you could get to restore your deleted files:-


...And many other more...


However you have to pay for these softwares. If you would like a FREE way, you could visit this 5 stars rated article, with just 4 easy steps that stands between you and any of your deleted files ---> http://www.ehow.com/how_2263300_files-windows-pc-free-software.html, or simply just download the file "Undelete Plus v2.94" on the URL: http://undelete-plus.com/download.html.
More explanation and another freeware software could be found on this site: http://www.aumha.org/a/recover.php

Hope that this post was helpful to most of you, because i believe that knowing this information is very relevant.

Post by: Mayez Kabbara.

Sunday, May 4

podcasting


While blogs have turned many bloggers into journalists, podcasting has the potential to turn podcasters into radio personalities.

what is podcasting?
"A podcast is a series of digital-media files which are distributed over the Internet using syndication feeds for playback on portable media players and computers. The term podcast, like broadcast, can refer either to the series of content itself or to the method by which it is syndicated; the latter is also called podcasting. The host or author of a podcast is often called a podcaster."

"Podcasting is quickly becoming a buzz word among the techie crowd. So what is podcasting, anyway? Podcasting is online audio content that is delivered via an RSS feed. Many people liken podcasting to radio on demand. However, in reality, podcasting gives far more options in terms of content and programming than radio does. In addition, with Podcasting, listeners can determine the time and the place, meaning they decide what programming they want to receive and when they want to listen to it."

a podcast is an audio broadcast that has been converted to an MP3 file or other audio file format for playback in a digital music player or computer. The "pod" in podcast was coined from "iPod," the predominant portable, digital music player, and although podcasts are mostly verbal, they may contain music.

Podcasting can be used for:
1. Self-Guided Walking Tours - Informational content. 2. Music - Band promotional clips and interviews.3. Talk Shows - Industry or organizational news, investor news, sportscasts, news coverage and commentaries.
4. Training - Instructional informational materials.
5. Story - Story telling for children or the visually-impaired.


how to create podcast in your blog?
First, you require an online space to save your recordings. Blogger doesn't offer hosting services for audio files; however, there are many providers of online storage space that offer both paid and free hosting services, such as Box.net, MoveDigital, DreamHost, and BlueHost.

Once you've uploaded your files to your web host of choice, you have to enable enclosure links to link to the file from within a Blogger post. To do so, just go to your Settings Formatting tab and set the "Show Link fields" option to "Yes."
This will add the enclosure link fields to your post editor.
When composing a post, you'll then see a field for your enclosures. From there, just enter the URLs of your audio files, and your blog will instantly become a podcast.
If you'd like to further customize your podcast, you may be interested in checking out FeedBurner.

By processing and optimizing your existing Blogger feed, FeedBurner not only offers extensive podcasting options but also the ability to customize, optimize, and monetize your feed and to track the number of listeners subscribed to your podcast.

posted by: Ghyna kurdy
www.blogger.com

Wednesday, April 30

How to store online

This post is related to "online storage" post. In this post i will explain in simple steps how you can store (and share) your files online, so that you could use this important Internet feature.

Of course the Internet is a black-hole that contains huge amounts of numbers of sites that helps us to enjoy this feature, so for that reason we wont talk about them all! We will talk about some of the best FREE sites between them, then maybe later you will learn the concept and be able to use any other site.


Picture files (jpg*, bmp, gif, etc...):-


There are many sites that you could store and share pictures that you know of (facebook, hi5, bebo...). But these sites listed below are limited to still images.


  • Kodak Gallery: Allows you to share, store, organize, edit, buy and sell photos. This site mainly concentrates on printing digital photos, on mugs, cards, calenders, etc... This site has a maximum limit of 150Mbs. To watch the video tutorial for that site click here. To create an account and get started on this site click here.


  • Snapfish: Owned by the HP Co. Aims to help us in storing unlimited numbers of digital photos, helps selling them, and offers us free pictures. To get started on snapfish click here. To see how it works click here.


  • Photo Bucket: Using this site you could also store video and music files. You could share, and link them to your personal or any other site or even to your blog. You could even make slide shows with music. To join.
Video files (mpg*, mpeg*, avi*...):-


Multimedia (Most if not all media files):-


  • MediaFire: (The one i use) Up to 100Mbs storage space. Lets you link your files to your website or blog. Very easy to use and not complicated at all. Signing up to this site doesnt take any effort at all. After you enter mediafire.com, on the top-right side you can easily create a new account or sign-in without even leaving the current window you are in. For more information how to use this site and why to chose it click here.


If you care to Back-up your files, here are some useful sites:-


  • Drive HeadQuarters: To sign up, make sure you know all the features and help you need from this link. You can download a software from this site that will back-up your files every time your Internet is on. Everything is explained on the homepage using articles and live demos. (Up to 1, 2 Gbs).


Mozzy: Allows 2 t0 3 Gbs of space. Also, all is explained in this site, nothing is complicated. To sign up, click here.


Posted by: Mayez Kabbara.

Tuesday, April 29

Word Press

Wordpress is a free blogging that helps you to create a complete website that deals with a certain topic and take over the whole business. With wordpress all you have to do is to add a free tool to your blog to convert it to a remarkable website. The readers won't even notice that they are visiting a blog.


How to make it work:


---> http://www.gnc-web-creations.com/wordpress-installation.htm


Download the wordpress to your pc, by Going to wordpress.org. In order to access the computer file, you have first to decompress it.
After that, you must modify certain things before uploading the file.
Change the file named "wp-config-sample" to "wp-config" inside the folder.
Then, include your data base information in the following things:


  • Insert The name of the database in the ('DB_NAME', 'wordpress')

  • Insert MySQL database username in the ('DB_USER', 'username')

  • Insert The password of the database in the ('DB_PASSWORD', 'password')

  • Insert The database host in the ('DB_HOST', 'localhost')


Define ('DB_NAME', 'wordpress'); // the name of the database
Define ('DB_USER', 'username'); // Your MySQL username
Define ('DB_PASSWORD', 'password'); // ...and password
Define ('DB_HOST', 'localhost'); // chance you won't need to change.


You only have to change the highlighted area, and make sure not to remove the quotes. Once you have completed this, save the changes you have made.


Upload WordPress Files
Do not uplod the folder itself, but the files within the wordpress folder, by using your ftp program. But if you want a free ftp program, you have to go to filezilla.


Begin the WordPress Installation
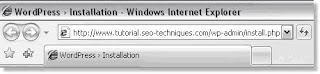
To begin the WordPress installation, you will need to run the WordPress installation script by accessing the wp-admin/install.php file from your browser window.

Example: http://www.madeupsite.com/wp-admin/install.php
In the address bar of your browser window, enter the URL of the domain or subdomain where you uploaded the WordPress files to, followed by: wp-admin/install.php

When you click the First Step link, a new window will open:


  1. Enter the name you have selected for your blog.

  2. Enter your email address and double check it before continuing.

  3. Place a check in the box for I would like my blog to appear in search engines like Google and Technorati. (This is important!)

  4. Click "Continue to Second Step".


Once you have followed the instructions on each new window, your blog will be created automatically for you. Make sure to save the user name and password provided.


Posted by: Ghyna Kurdy

http://codex.wordpress.org/Installing_WordPress

Sunday, April 27

Dear guests:


I've been told that my posts tend to be somehow geeky... so hopefully to resolve this problem i will do my best to make my incoming posts less complicated and more intimate.

Thank you
Mayez Kabbara